Summary
Uprights carry vertical loads and help stabilize the rack frame. When an upright is bent, twisted, crushed, torn, or shifted at the base plate, the safest next step is clear documentation and review. Do not guess from one close-up photo — collect the full location, full bay, anchor condition, and surrounding rack details.
In this guide
Jump to sectionWhy upright damage matters
Pallet rack uprights carry vertical loads and help keep the frame aligned. Lower upright damage is common because the bottom of the rack is exposed to forklifts, pallet jacks, pallets, and daily warehouse traffic.
The goal of a rack damage walkthrough is not to panic or shut everything down unnecessarily. The goal is to identify visible damage early, collect enough information for review, and decide whether the rack needs repair, replacement, guarding, or a deeper inspection.
A bent upright is not just cosmetic. A small-looking bend, twist, or base plate shift can affect the way load is transferred through the rack frame.
Common pallet rack upright damage patterns
The damage below is what warehouse teams usually notice first during a rack safety walkthrough. Some issues are obvious from a distance. Others only show up when you inspect the base plate, anchors, beam connection, or bracing around the damaged upright.
Local bends or kinks
A bend, kink, or bow near the lower upright is often caused by forklift or pallet impact. Check the front face, side face, and rear post before assuming the damage is isolated.
Twist or rotation
A twisted upright may look like the post has rotated out of square. This can happen from angled impacts, repeated contact, or rack movement at the floor.
Crushed lower sections
Crushed metal, buckling, or caved-in upright faces should be documented immediately. Include close-up photos and a full bay photo.
Torn or elongated holes
Torn punch holes, elongated beam connection holes, or stretched metal around connectors can point to impact, overload, or rack movement.
Base plate or anchor issues
Loose anchors, bent base plates, cracked concrete, or rack feet shifted out of position can change the urgency of the damage review.
Damaged braces or welds
Do not stop at the upright. Check horizontal and diagonal bracing, welds, and nearby frame members for signs the impact traveled through the rack.
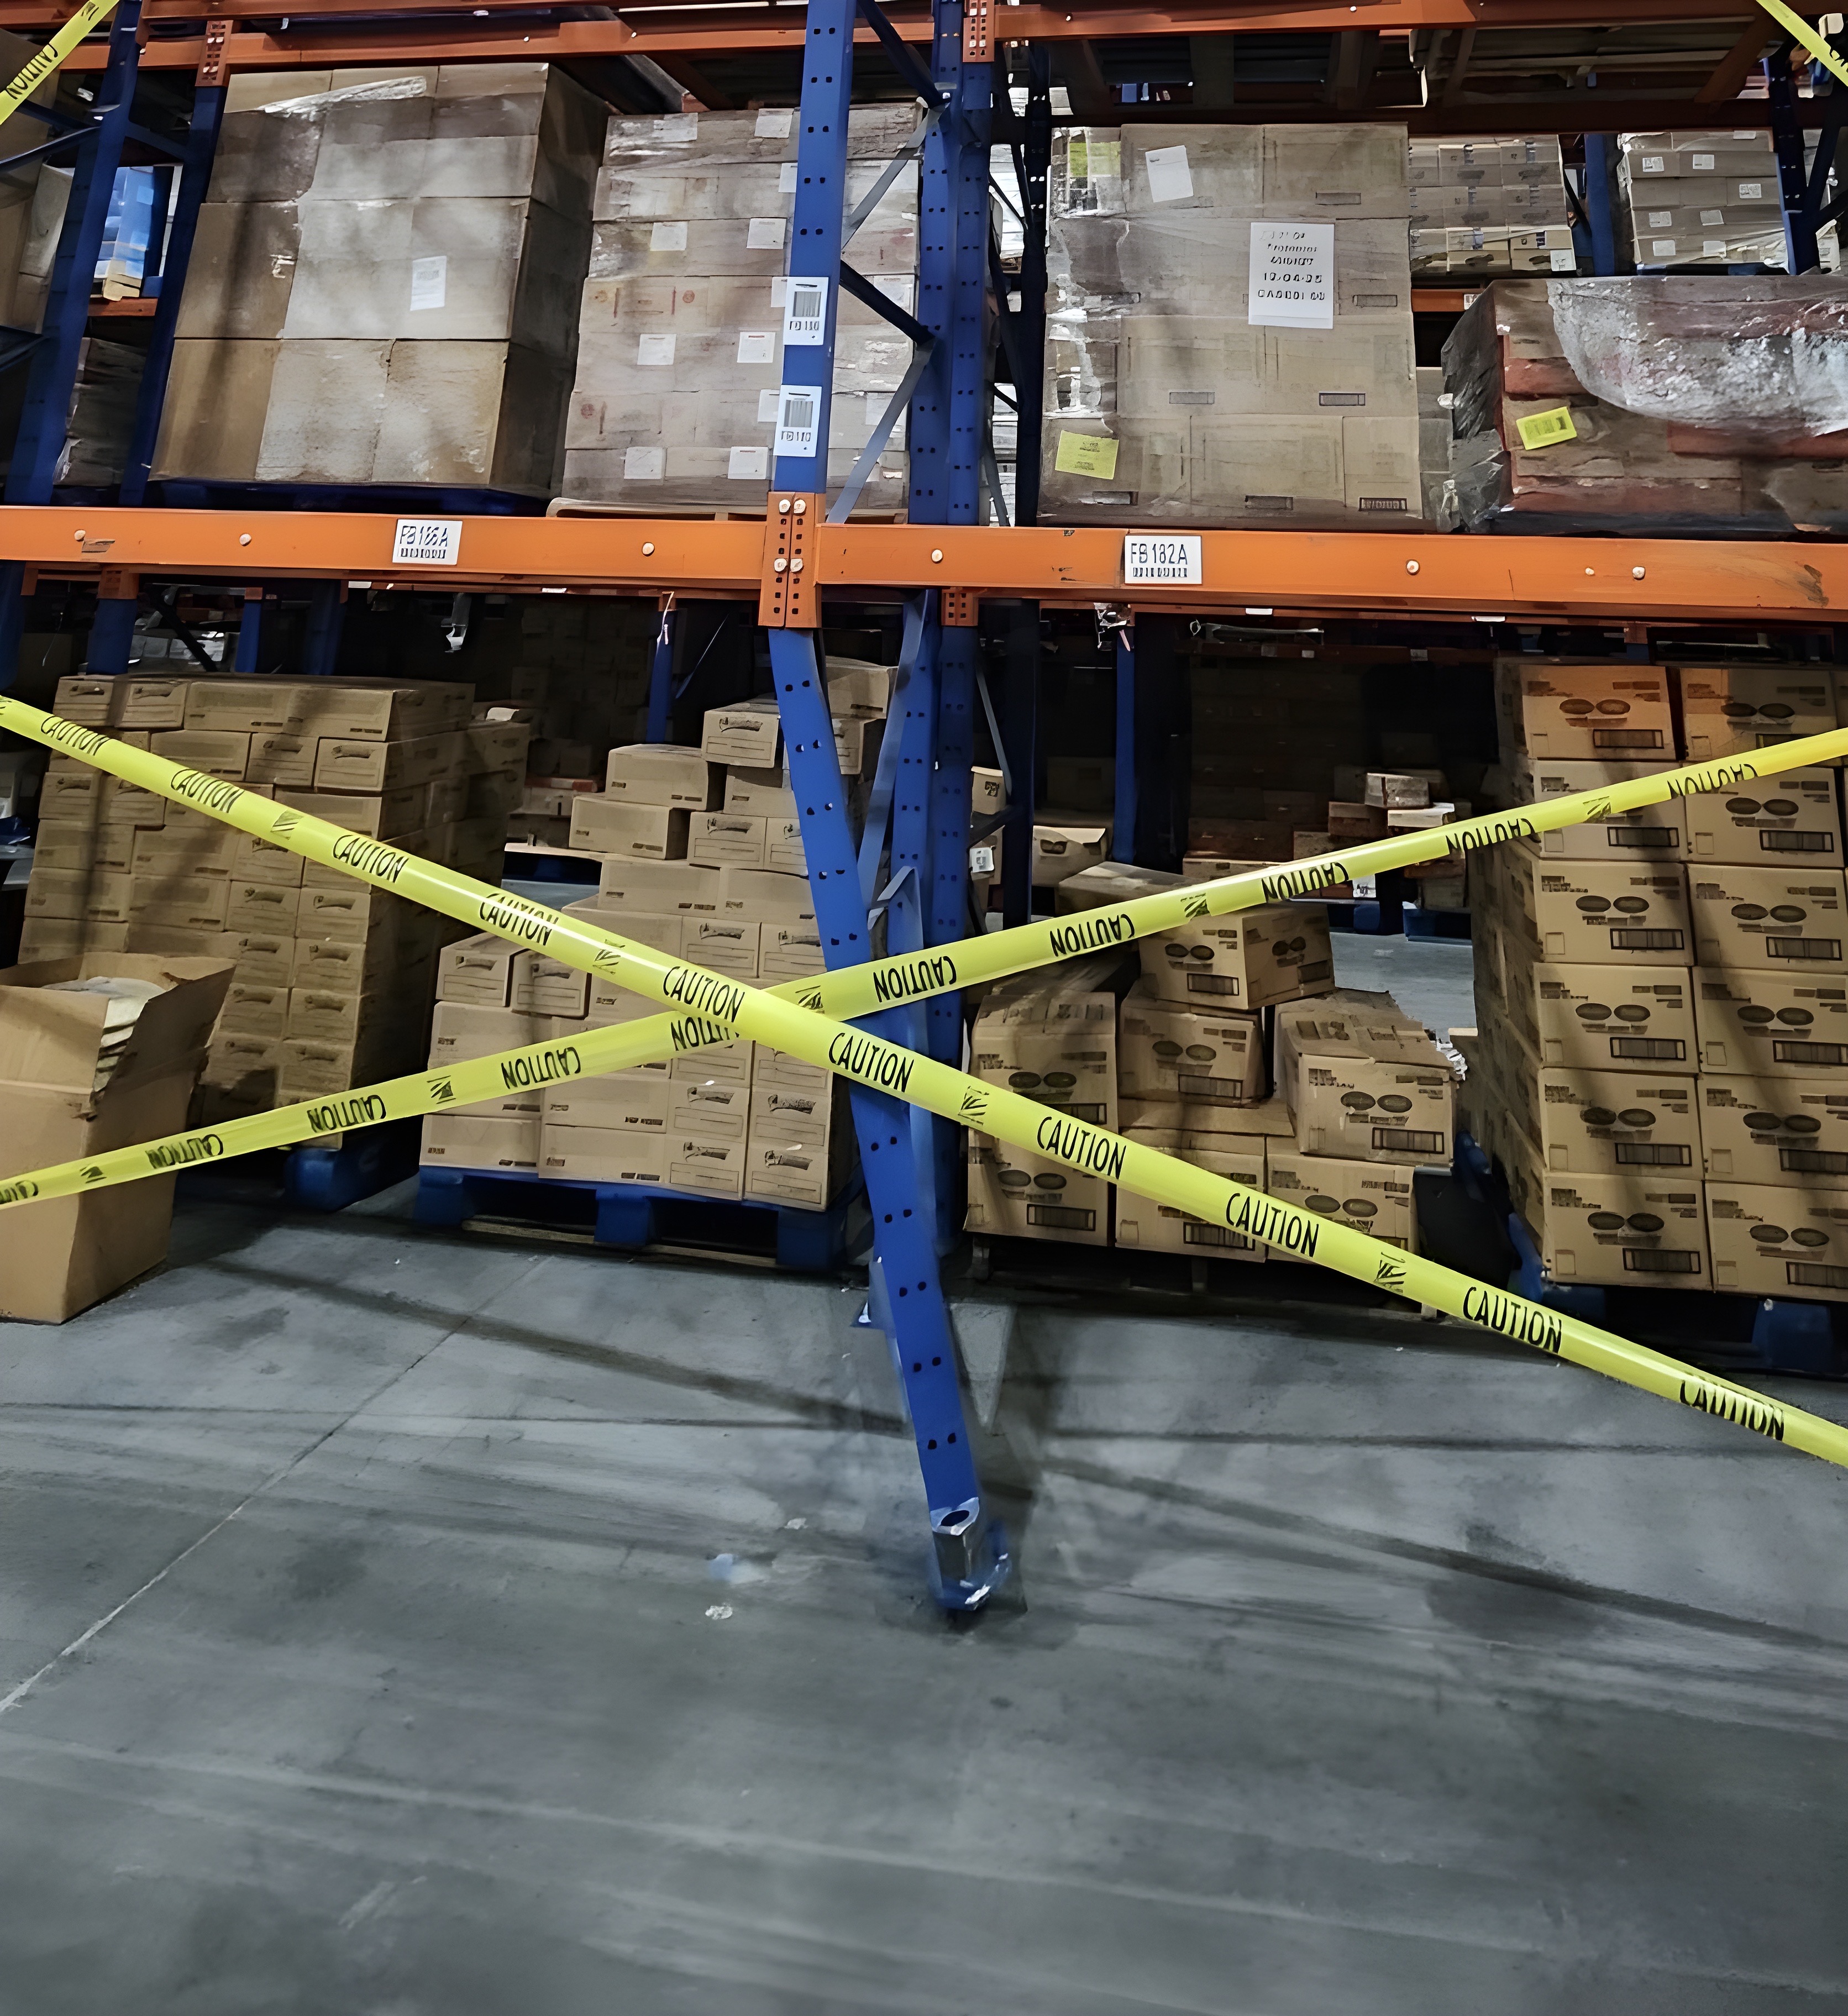
Damage example
Look at the full rack condition, not just the impact mark.
A close-up may show the bend, but the full repair decision needs more context: aisle location, loaded condition, base plate, anchors, beam elevations, and whether the rear post or braces were also affected.
Severity triage: what should get attention first?
A rack walkthrough should help the team prioritize. Some issues need immediate restriction and review. Others should be documented and scheduled into a repair or guarding plan.
Urgent
Restrict and review
- • Severe bend or crushed upright
- • Shifted frame or damaged anchors
- • Damaged loaded bay
- • Visible instability or leaning
Monitor
Document and plan
- • Light visible impact marks
- • Minor dent with no obvious shift
- • Missing or damaged accessories
- • Guarding needed in repeat-hit area
Prevent
Protect before damage
- • Row ends near turning traffic
- • Exposed front uprights
- • Dock-adjacent rack runs
- • Repaired areas needing protection
Do not ignore
Damage at the floor can matter more than damage halfway up the frame.
Lower upright damage, base plate movement, loose anchors, and cracked concrete can affect how the rack transfers load into the floor. If the rack foot has moved, lifted, or twisted, treat that as more than a surface issue.
Base plates
Check for bending, lifting, twisting, or displaced footplates.
Anchors
Look for missing, loose, broken, or pulled anchors.
Concrete
Photograph cracks, spalling, or movement around the rack foot.
What to document when you find rack damage
Good documentation speeds up the repair review. Poor documentation creates delays because the reviewer has to keep asking for basic details. The fastest path is to document the damage the same way every time.
- Wide aisle photo: show the full row, aisle, and surrounding traffic condition.
- Full bay photo: show the damaged upright, beams, load levels, and neighboring uprights.
- Close-up damage photo: show the bend, twist, crack, dent, tear, or impact mark clearly.
- Base plate and anchor photo: show the footplate, anchors, floor condition, and concrete.
- Rack profile photo: show the upright face, side profile, punch pattern, and any manufacturer tag if available.
- Location reference: include aisle number, bay number, row, column, or a simple map reference.
- Loaded condition: note whether product is still on the rack and which beam levels are loaded.
Fast documentation checklist
- • Aisle and bay reference
- • Wide photo from the aisle
- • Full upright photo
- • Close-up of damage
- • Base plate and anchors
- • Beam elevations
- • Load condition
- • Rear post condition
- • Bracing condition
- • Traffic or impact history
How to photograph rack damage for faster review
Do not send only one close-up photo. A close-up shows the damage, but it does not show the full rack condition. Use a three-photo method for each damaged location.
Wide photo
Stand back and capture the full row, aisle, and nearby traffic path.
Full upright photo
Show the complete upright from floor to beam connection, including braces.
Close-up photo
Capture the impact area, base plate, anchors, and any torn or crushed metal.
What to do after damage is found
Your next step depends on severity. Light cosmetic marks may be documented and monitored. Visible structural damage should move into a repair review or inspection workflow. Severe damage should be restricted according to your internal safety process.
If damage appears minor
Document and monitor.
- • Add the location to your rack inspection notes
- • Take consistent photos
- • Watch for repeat impact in the same area
- • Consider column guards or end-of-aisle guards
If damage appears structural
Restrict and request review.
- • Follow your internal safety process
- • Document the damaged location
- • Reduce risk before moving product nearby
- • Request repair, replacement, or inspection review
Repair vs. replacement: how to think about it
Finding damage does not automatically mean the entire rack frame must be replaced. It also does not mean a repair kit is always the right answer. The decision depends on damage location, damage severity, rack profile, base plate condition, rear post condition, load requirements, and documentation needs.
| Question | Repair may fit when | Replacement may fit when |
|---|---|---|
| Is damage localized? | Damage is concentrated at one upright or lower frame area. | Damage affects multiple components or a larger frame section. |
| Is the rack profile known? | The upright profile and measurements can be verified. | Rack data is missing, altered, or not practical to document. |
| Does the layout still work? | The existing rack layout still supports operations. | A redesign, re-slotting, or new load requirement is already planned. |
| Is repeat impact likely? | Repair can be paired with guarding to reduce future damage. | Replacement alone will not solve the issue if the traffic pattern remains. |
Do not forget guarding after the repair
If the same upright or aisle end keeps getting hit, repair alone may not solve the problem. Guarding can help reduce repeat damage after the rack is repaired or after a replacement frame is installed.
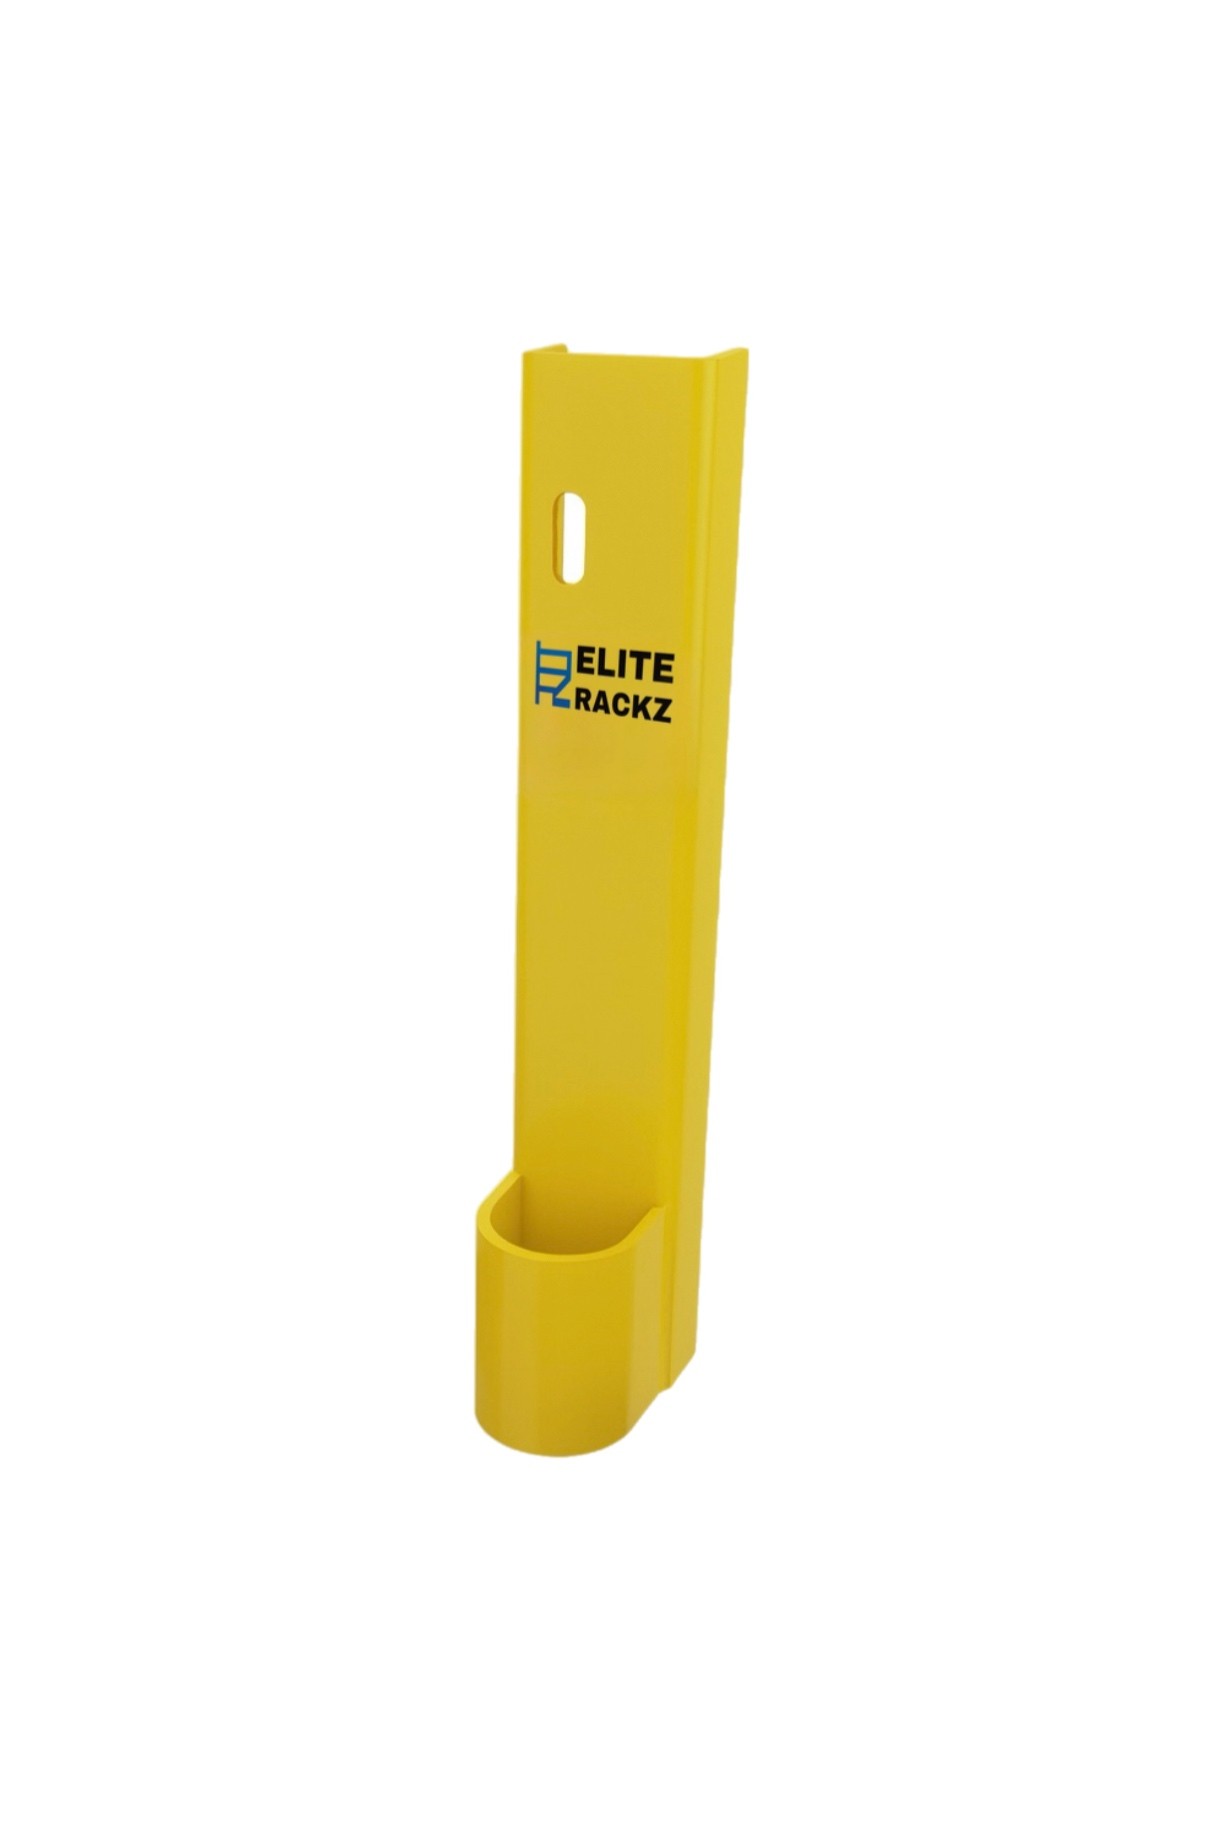
Column Guards
Protect individual uprights and lower impact zones after repair.
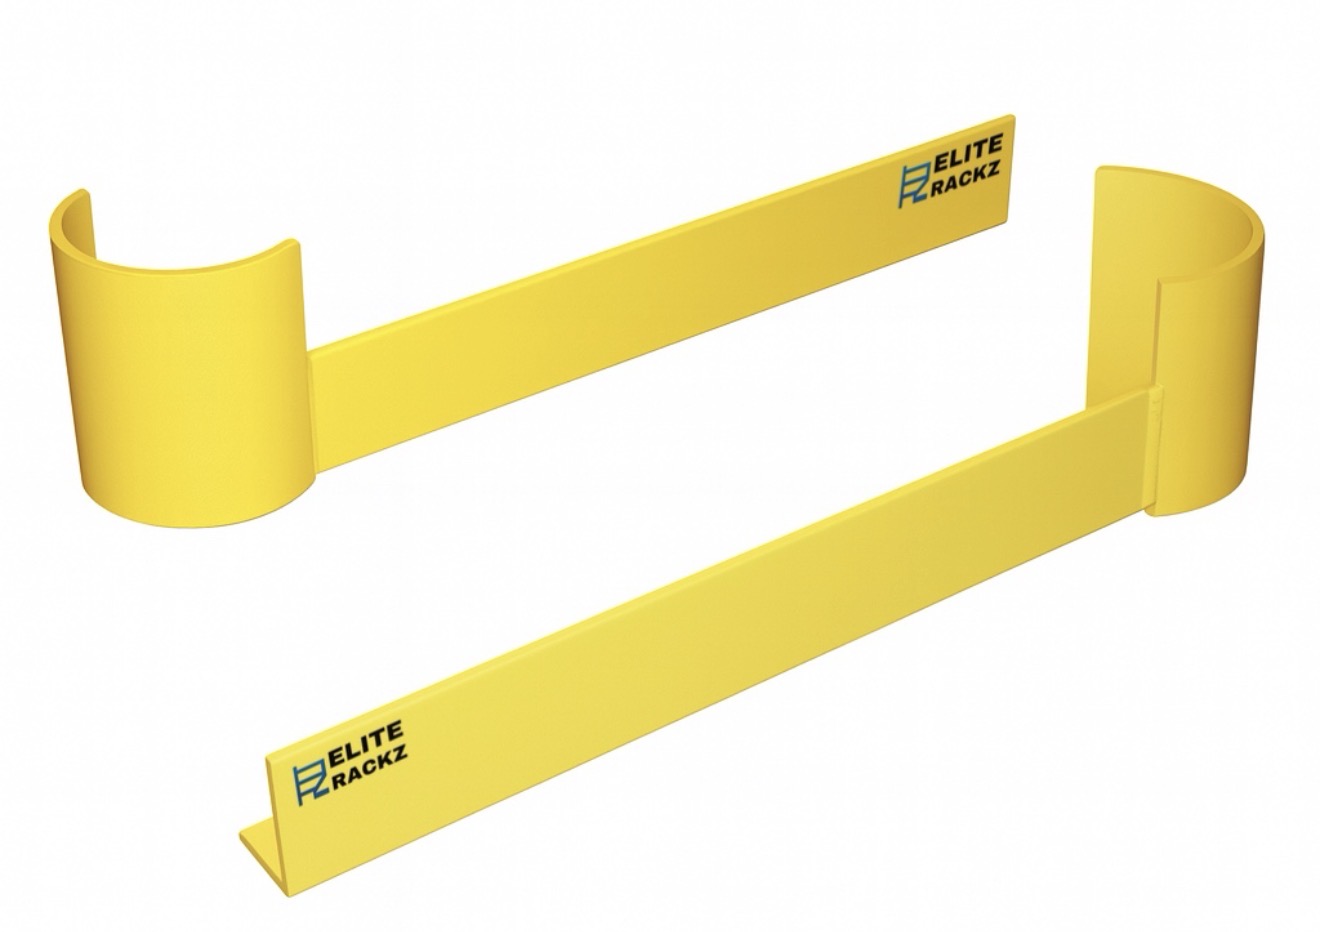
End-of-Aisle Guards
Protect exposed rack row ends from turning traffic and repeat forklift impact.
FAQ
What are common signs of pallet rack upright damage?
What should I document when I find rack damage?
Should damaged pallet rack be taken out of service?
Can damaged pallet rack uprights be repaired?
Found rack damage?
Send photos before the decision stalls.
Elite Rackz can review the damaged upright, base plate, anchors, rack profile, and surrounding bay to help determine whether the next step is engineered repair, replacement, emergency support, or guarding.